
Capturing images of geese in flight is often how many photographers begin to develop their BIF technique. Geese make ideal subjects since they are large, slower flying birds. Their flight patterns tend to be in reasonably straight lines and they often announce their approach with a chorus of honking, allowing us to get prepared to take some photographs of them.
This article shows a selection of images of geese in flight as well as providing some thoughts about technique.
NOTE: Click on images to enlarge.

Typically when shooting geese in flight I use continuous auto-focus (AF-C) with subject tracking. I often capture single frames and will also shoot at 15 fps with my Nikon 1 V2 when trying to capture a range of wing positions.

I most often use centre-weighted average for metering as I find this tends to give me a good, balanced exposure on a large bird like a goose.

As with other BIF subjects always capture a view with the eye of the bird clearly visible. Depending on the angle of the sun you may need to lighten up the eye of the goose in post to give it some definition. Images of geese flying away from you without their eyes visible aren’t worth capturing.
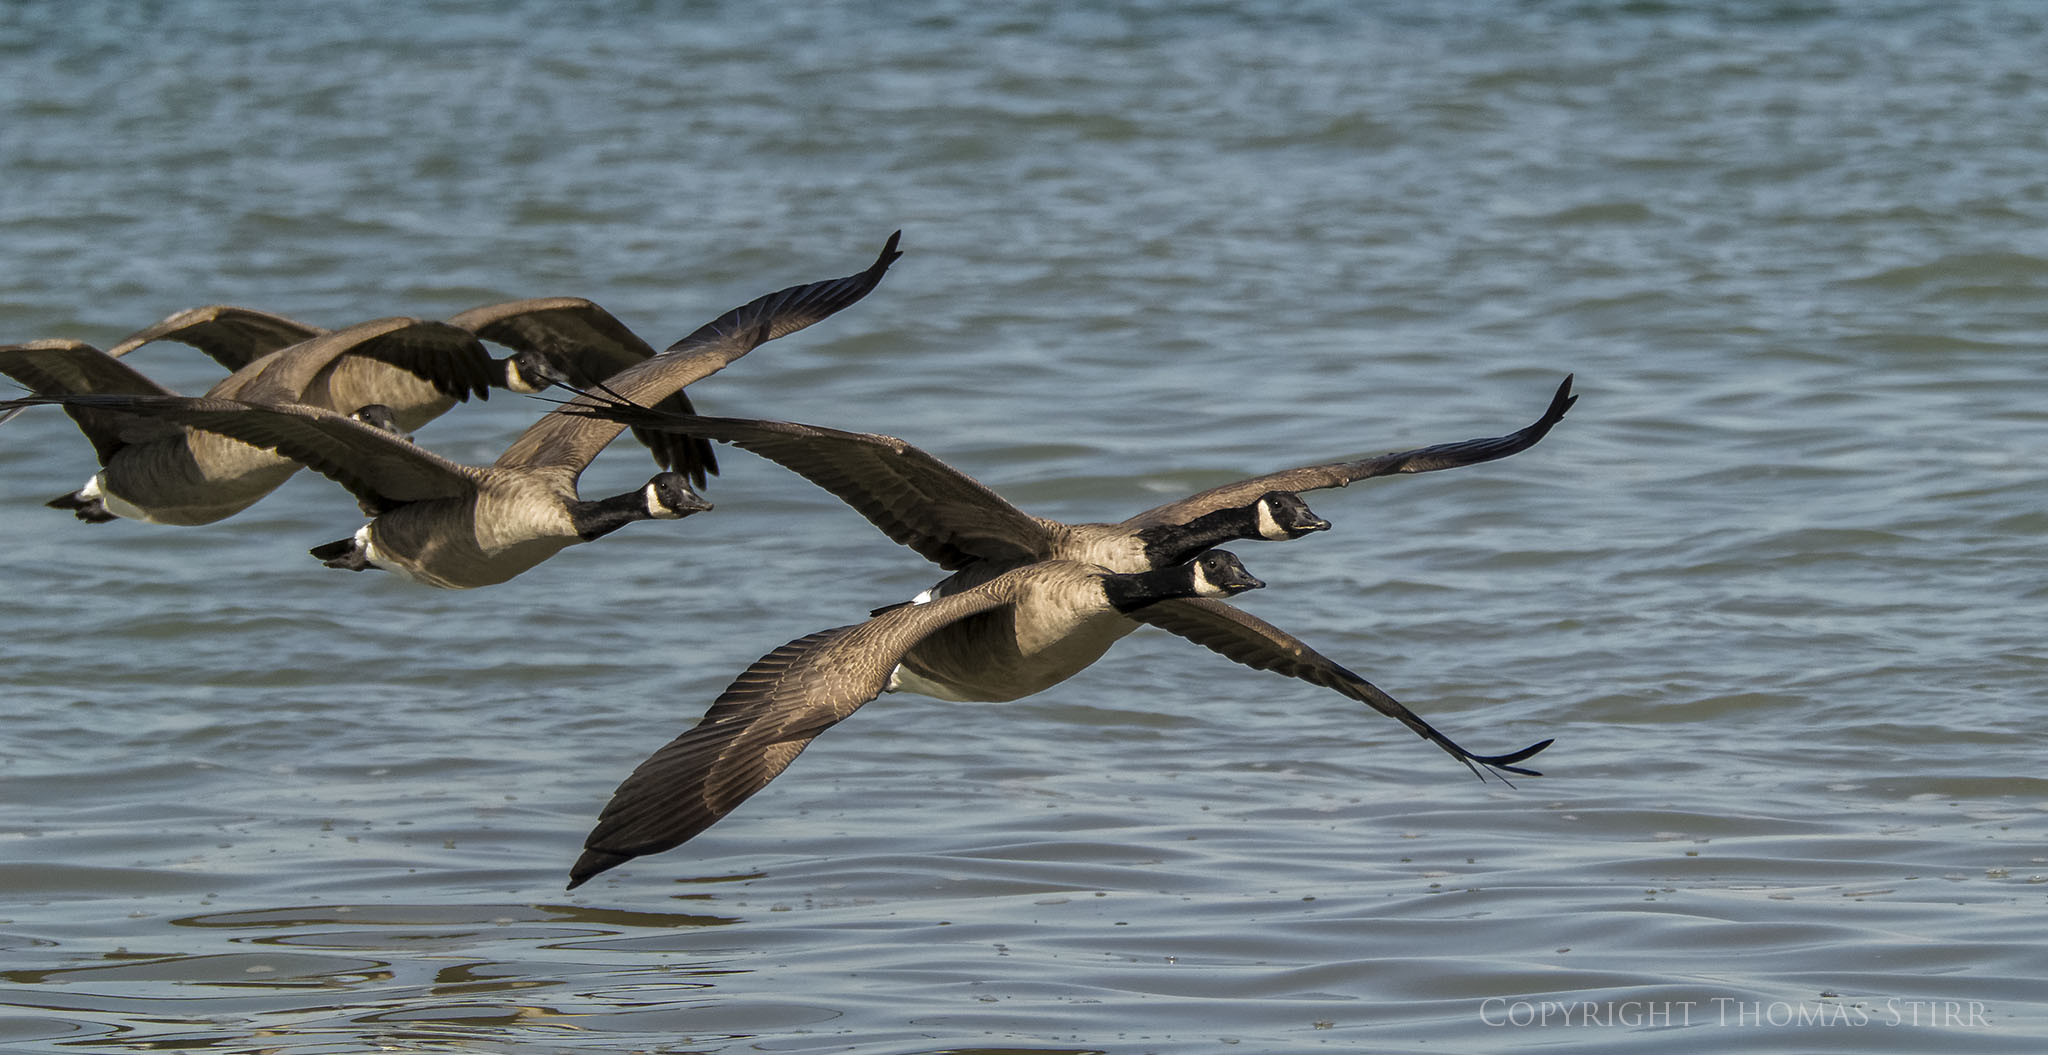
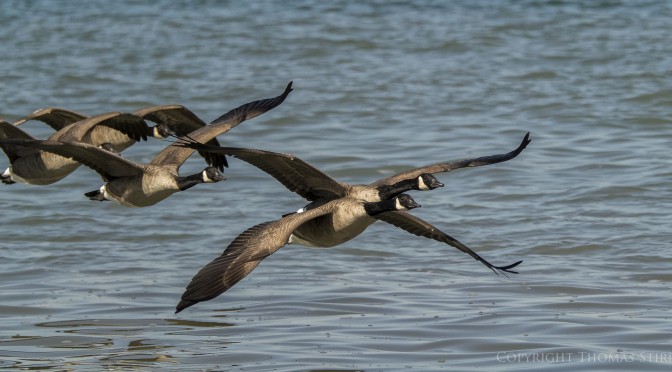
If a number of geese are approaching you in flight always try to acquire focus on the lead bird. Allow some ‘head room’ with your framing when possible.

Whenever possible try to capture your images as the geese are flying into the sun. This provides the best chance to get good detail on the head and neck as well as with body feathers.

If the geese are flying towards you with the sun at their backs it is often beneficial to wait until you can capture more of a profile view. This tends to limit shadows and offers the best opportunity to get some feather detail on the back and wings of the bird. Any time that geese bank into the sun, even slightly, it is a great opportunity to capture more wing detail.
As you can see with the following three images, shooting at as high a frame rate as your camera will allow provides more opportunities to capture a range of wing positions.

When trying to capture full frame images to avoid cropping in post, leave some ‘head-room’ with your framing whenever possible. This is most easily done by keeping the point where the body of the goose meets its neck close to the centre point of the frame.

If you are anticipating that the geese will fly from a specific direction towards you, it can help to pre-focus your lens.

Capturing aggressive interactions between geese can result in very dramatic images. This type of action can break out very quickly and usually begins with both geese in the water. Pre-focusing your lens can be extremely helpful when trying to capture these types of images.
Watch for one goose displaying an aggressive body posture. This is most commonly shown by a lowering of the head to just above the water level and an outstretching of the neck.

The aggressive goose will typically swim towards another goose that it is trying to intimidate. The other goose will usually swim away quickly and often nothing else will happen.
If the other goose does not swim away quickly enough the aggressor goose will often burst forward and both geese will take flight. These flights may only last for a few seconds before both birds land on the water again, so timing of your shot is critical.
Different photographers have their own views on camera settings. Some prefer to shoot in shutter priority, others prefer to use aperture priority, and some like to shoot with manual settings. I don’t think it matters as long as you end up using a fast enough shutter speed to freeze the wing motions of the geese in flight and you have sufficient depth-of-field to get good detail on the subject goose.
After some experimentation with my Nikon 1 gear I now prefer to shoot with Manual settings, usually with aperture set at f/5.6 and shutter speed between 1/1600 and 1/4000 depending on the bird species and lighting conditions. I often use AUTO-ISO (160-3200) and monitor exposures as I’m shooting to make sure that I don’t overexpose images.
My intent is to keep this photography blog advertising free. If you enjoyed this article and/or my website and would like to make a modest $10 donation through PayPal to support my work it would be most appreciated. You can use the Donate button below. Larger donations can be made to tom@tomstirr.com through PayPal.
Article and all images Copyright Thomas Stirr. All rights reserved. No use, duplication of any kind, or adaptation is allowed without written consent.
Thank you Tom! I was working on this (more or less) yesterday afternoon with my D7100 actually. My neighboorhood pond has a large number of Canadian geese all the time and I had fun trying too shoot them, even if they weren’t doing a whole lot of flying. More like fluttering onto the ice or into the water. I need to crank up my SS. I was at 1/1000 but that still wasn’t enough for the freeze I want.
Until I noticed the Great Blue Heron hanging out fishing. That’s such a treat for me (still a neophyte with wildlife) that I focused on it and I was rewarded with a full series of photos as it strutted away from the water with the fish in its beak until it swallowed the fish and returned to fishing.
Thank you for the article! I’ll keep practicing with the geese.
Hi Sean,
Glad you found the article useful! Sounds like you are having a lot of fun with some of the local waterfowl!
Tom
Hi Tom
Absolutely fantastic shots. Here are a few questions that are of a great interest to me.
1-Would you please let us know, what size printing vs iso you can print producing a fair quality to a high quality printing with such a small camera sensor ?
2- What are your AF settings, and are they different on a D810 than they are on the Nikon 1 V2 for this kind of shooting ?
Hi Luc,
Thanks for the positive comment – I’m glad you enjoyed the images!
To answer your questions:
1) I typically print my Nikon 1 photos at 12″ x 18″ (30.5cm x 45.7cm) image size. As long as I have used DxO OpticsPro 10 with PRIME noise reduction I find I can get acceptable quality at ISO-1600 and sometimes as high as ISO-3200 at this size. Obviously ‘acceptable’ is a relative term and some folks may be more demanding with their prints than I am. If I have shot an image at base ISO-160 or close to it, say up to ISO-400, I can push the size a bit larger to 14″ x 21″ (35.6cm x 53.3CM) and get quite good results. We print all of our images in-house on a 24″ HP Z3200 12-colour Designjet printer. I haven’t tried to print a Nikon 1 file any larger but it certainly would be interesting to do so to see what result can be achieved.
2) It has been almost 6 months since I even held the D800 I used to own and to be honest I really don’t remember much about its AF settings. My wife calls that my ‘convenient memory’…i.e. if I don’t actively need the information for what I’m doing it tends to get wiped out of my brain! I always refer to this phenomenon as an ‘ability to focus’…lol. As far as my Nikon 1 gear goes for birds in flight I typically use continuous auto-focus with subject tracking and shoot either single frames or at 15fps. Metering is typically centre weighted average for most birds, although I sometimes experiment with spot metering. When shooting with my Nikon 1 gear I used to utilize aperture priority setting my aperture to f/5.6 and manually setting my ISO. I’d then adjust ISO as needed while shooting to maintain a fast enough shutter speed for the type of bird I was photographing. I changed this summer and now shoot birds in flight with Manual settings (f/5.6 and 1/1600 to 1/3200 is quite common for me to use) and then use an auto-ISO setting to allow for differences with light. I’ll watch my ISO and tweak my shutter speed up if needed to avoid over exposing images.
Tom
Tom
Thanks for answering.
So your wife is like mine, they both are using similar sentences to describe our lack of memory.